Please note: the Gutenberg editor for wordpress was introduced in 2018 and is now the standard editor. The instructions given below relate to the Gutenberg editor.
WordPress is designed for bloggers, and once you know what you’re doing it’s pretty easy. But I understand that it’s a bit daunting when you first set out, so here are the basic instructions for creating and publishing a post.
Logging in to your website

Firstly log in to your WordPress website. Unless your designer has told you differently, the URL for the log in page is likely to be http://[your-website-url]/wp-admin. You should then see a log in page that looks something like this, although the branding and colours may look a bit different. Your website designer will have given you a username, which you enter in the two boxes before clicking on the Log in button.
TIP 1: if you are using your own computer check the “Remember Me” check box. This means that next time you try to login you have only to start typing in your username before it will appear just under the box. Click on it and your username and password will pop into their respective boxes!
TIP 2: if you have forgotten your username password hover over and click on “Lost your password?”. You will be asked for either your username or email address, and, providing you type in the password that is associated with your user account, the lost information will be emailed to you.
The Dashboard
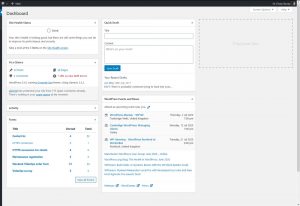
You will now see a screen that looks something like this:
NOTE: The amount of content and the items that you see down the left hand column will depend both on the design of your website and on the user level that you have been assigned.
Creating a new post
Before I go any further, are you sure it is a post that you wish to create? You may want to read my previous post on How to…Know your posts from your pages.
On the left side of your dashboard there is a column that will take you to all areas of your website that you are able to edit. At the top, just below Dashoard you should see Posts. Hover over posts and you will see a drop down list that will include All Posts and Add New. All Posts gives you a list of all the posts that have either been published or are created as drafts ready to be published. To create a new post click on Add New.
TIP: If you cannot see Posts in the left hand column it is likely that your user level is not high enough to be able to create and edit posts. In this case, contact your website administrator and ask them to change your user level to Author or above.
Adding text to your post
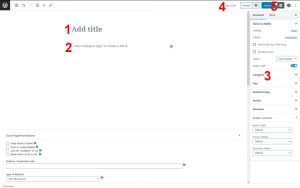
- Enter the title of your post in the Title text box [1]
- Place your cursor in the block where it says “Start writing or type / to choose a block” [2] ready to start typing your text. This is a “What You See Is What You Get” (WYSISYG) editor, so you will be able to see roughly what it will look like on the published page. As you type you will find a tool bar appears above your text which will enable you to add formatting. The icons in the toolbars are very similar to those you might find in Microsoft Word or similar programs. There are a couple of these that you may not have come across but are worth knowing about for a web page.
The insert/edit link and remove link buttons in the top row (a bit like a paperclip with a link or a break respectively) enable you to add hyperlinks to your content so that readers can click to something of interest. Add some link text, use your cursor to highlight it. If you wish the link to open in a new screen click on the “Open in new tab” link (if you are sending your reader away from your website I would usually recommendend this), then click on the arrow and “Voila”! - Your website may well be designed so that there are a number of different categories for posts on the site. For example, as well as the “How to…” posts on my website, there are testimonials and these are created as different categories of posts. If this is the case your website designer should have explained this to you and detailed which category would be appropriate for which type of post. Select the appropriate category(ies) for your post in the Categories box [3], which you will usually find to the right of the post editor screen.
- If you wish to save the draft of your post to finish later click on the Save draft button at the top right of your screen [4]. However if you are ready to reveal it to the world click on the Publish button [5] just underneath and “Hey, presto!” you will be able to see your post on the website.
Future articles will cover adding images and other media files to your post, simple SEO for your post and more.

Leave a Reply